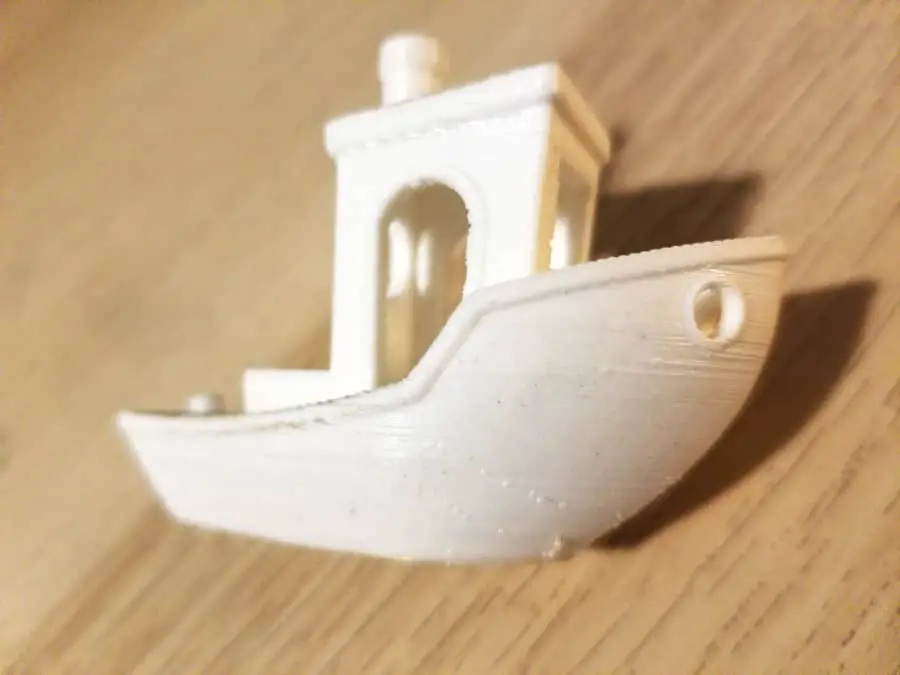
If there’s any battle I’ve fought the most with 3D Printing, it would definitely be random lines on my print. Over the years, I have learned what has caused them and how to overcome them.
Why are there lines on the side of my 3D print? Here are all the main causes:
- Over-extrusion
- Printing too quickly
- Mechanical problems
- Damaged extruder
- Temperature fluctuations
- Unstable Print Surface
There’s a lot of ground to cover here, but I have dealt with all of these. Here is the ultimate resource for finally getting rid of those annoying lines.
Over-extrusion
The number one cause of lines on a 3D print is over-extrusion. It doesn’t have to be major over-extrusion either; it could just be a little extra plastic getting pushed out as the layer finishes printing.
Temperature too high
Over-extrusion is most commonly caused by your temperature being higher than it needs to be. A drastic temperature difference can lead to the print looking melted, but a minor one can lead to only a small amount of unwanted plastic coming out.
Some people print at a much higher temperature than they need to use. Some PLA filaments have a melting point of 180 degrees Celcius, but many hobbyists like printing in the 200-215 degree range.
There’s no doubt that higher temperatures can lead to better layer adhesion, but that brings along a host of issues. Blobbing and oozing are two prominent issues that plague people everywhere.
You should be aiming to print at the minimum temperature possible without causing other issues. If you get under-extrusion or awful layer adhesion, it’s probably too low.
It just takes some time and effort to find the sweet spot for your printer and filaments.
Temperature Fluctuations
I’ve written before about how a thermistor could cause wrong temperatures, but fluctuations is another issue. The thermistor is what reads the temperature of the hot end. The PID controller controls what the temperature is set to.
Temperature fluctuations are usually pretty easy to spot. Just take a look at the temperature readings and see what they say. If they are fluctuating more than 5 degrees Celcius, there’s a problem.
You can try to re-calibrate your PID controller, and you’ll need to find a guide specific to your printer. If that doesn’t work however, then you may have to send your printer’s circuit board to get replaced.
Improper cooling
The quality of your cooling will affect the quality of your prints. The first upgrade I did for my Creality CR-10 was printing a new cooling fan mod.
There are a ton of mods you can print for your printer, and I highly recommend printing cooling mods. The one I printed made the fan flow better onto the print, resulting in faster cooling and cleaner lines.
It was the one mod that gave me a very noticeable improvement in quality. Cooling is definitely a factor that should not be overlooked.
Flow rate too high
Flow rate is how much filament comes out of the nozzle. You can adjust this setting in your slicer. In Cura it’s called flow rate, but in Simplify3D it’s referred to as extrusion multiplier.
This setting will need to be adjusted and optimized for each layer height you print. The flow rate for a .1mm object will differ from a .4mm print.
The easiest way to find out the optimal extrusion multiplier is to print calibration cubes. I have printed so many of those things I’ve lost count. All you have to do is set it to an extrusion multiplier you think will be good, and either go up or down based on your print.
If you get lines on the side, it means your flow rate is too high. If you start to get holes and under-extrusion, its too low.
You will probably have to do this for each filament you have too. Even the same brand of filament could have different qualities just based on its color.
Once you have it figured out, save your process so you can use it later.
Printing too quickly
If a car drives too quickly around a corner, it’s gonna slide. If your extruder moves too quickly, it’s gonna deposit excess filament on the sides of your print.
Sometimes this is more noticeable on curved sides, or it could only show up on flat edges. Whichever it is, it probably can be reduced by turning your speed down.
If you want to keep your current speed, you can adjust your flow rate. However, there comes a point where it’s just too fast for your printer, and it’ll cause other issues.
If you’re printing faster than your printer’s recommended speed, slow it down. If you’re below that, try adjusting your flow rate and your cooling first.
Mechanical Problems
If you’ve been into 3D printing long enough, you’ve surely heard about Z-banding. Z-banding is when a 3D print has horizontal lines running along its outer shell. These patterns are usually in a repeating pattern every few layers.
Z-banding can be caused by a ton of different issues, but I’ll only mention a few here. Also, this issue is almost always related to mechanical issues.
Lead screw
The most common issue found seems to be with the lead screw. The lead screw is the long, threaded pole connected to your Z-axis stepper motor. It’s what makes the Z-axis move up or down.
Sometimes, this lead screw can become bent, creating weird patterns as the printer moves up the axis. If you look directly at the screw and how it moves, it should be as straight as an arrow.
If it is bent, you may need to find a guide for your printer on how to take it apart.
Belt and wheel adjustments
Belts and wheels are essential for the quality of your print. If these are not adjusted, you will have lots of weird lines on your prints.
Every wheel should roll smoothly, and every belt should be nice and tight. Belt tightness is different for every printer, so find out what’s right for your machine.
Rod maintenance
When a 3D printer uses rods to move along an axis, these rods will wear down over time. Every once in a while, you should clean off the rods and add a little lubricant with them.
This makes sure that there is nothing blocking the printer’s movement, and that it can flow freely along whatever axis it needs to.
Damaged extruder nozzle
I’ve ruined my share of extruder nozzles, and I’m not proud of it. The first time I had this issue, all my prints had a very odd horizontal pattern on each layer. While it produced an interesting texture, it looked pretty awful.
I searched all over the place for a fix, until I finally decided to order a new nozzle. When I removed the old one, I discovered that the entire tip had been scraped off.
This can happen for two reasons. The first is that the nozzle is too close to the bed, and it scrapes the tip off. The second is that you accidentally scrape it off in an effort to clean it.
In my case, it was the second option. Always be extremely careful about scraping your nozzle, especially when the metal is warm and soft.
Your printer probably came with nozzle replacements, so just use one of those. Don’t forget to update your slicer settings if it’s a different size nozzle from what you were using.
Unstable print surface
An unstable surface can refer to either the print bed or the surface your printer is on. Either one of these can create lines known as ringing.
Ringing is caused by the vibrations of the printer as it moves back and forth. It’ll make your prints look terrible if it’s bad enough.
If you aren’t using any clips for your printer bed, get some. The bed will move around too much during printing, especially the taller the prints get.
The printer’s location also matters. If the table the printer is on isn’t sturdy, it’ll vibrate. If the ringing still appears after securing the table, then you might need some vibration absorbing feet for the printer.
You can order these online or get them from a local hardware store. Better yet, you can print them with flexible filament.
Another thing you should know about vibrations is that tall and thin prints will create more vibrations the further up it is. I once tried printing some tall, flat lithophanes, and ended up with some nasty ringing.
I fixed it by making the lithophane curved, which provided more stability to the print. The ringing disappeared completely.