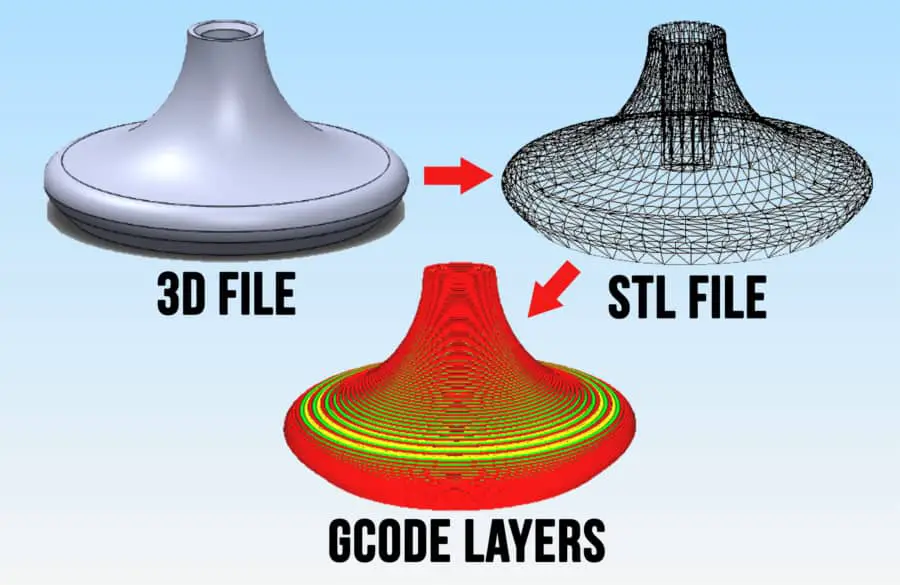
3D slicing programs, sometimes referred to as slicers, convert digital 3D files into G-code which 3D printers understand. They calculate a path for the nozzle to follow based on the geometry of the part and user-specified settings.
What does slicing software do?
3D printers are surprisingly simple machines. They gradually build objects layer-by-layer, and this process takes anywhere from a few minutes to many hours. These machines appear quite complicated at first, but they operate by following a long list of very simple instructions to print out parts. Slicing software allows you to tune settings and change how your part is printed.
Your 3D printer understands how to print layers but STL files on your computer are described by a bunch of connected triangles. Your 3D printer won’t know what to do if you directly send it a 3D object or an STL file so first, you must import your file into a slicing program to turn it into lines of G-code.
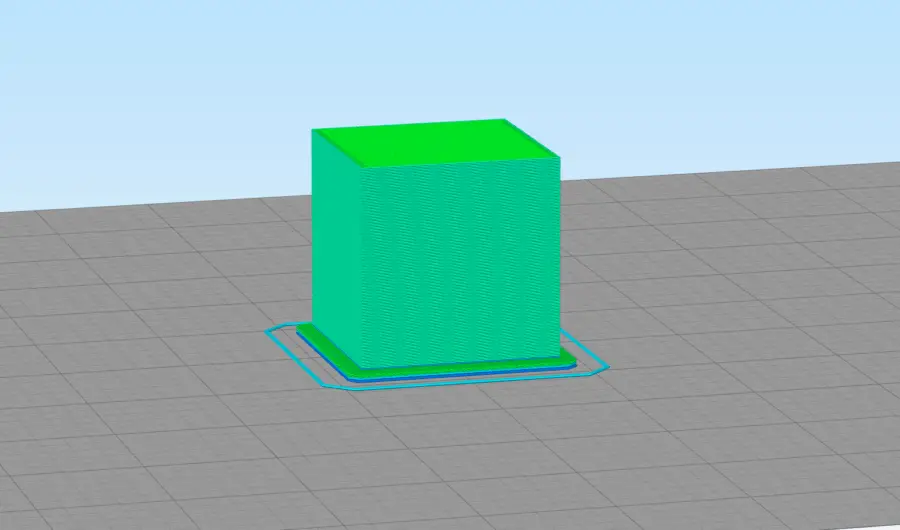
Before turning your 3D file into G-code, slicing software allows you to change printing parameters so you can adjust features such as layer height, wall thickness, and printing temperature. Slicers can generate support structures so you can print overhangs, and they also can generate material to help with build plate adhesion such as skirts, brims, and rafts.
Slicers allow you to preview the layers of your model before you print it. This is helpful so you can ensure the part will be printed the way you intended. Additionally, most slicers can repair and slice STL files that have errors or defects such as holes in the mesh, non-manifold faces, or overlapping geometry.
How does it work?
Slicing programs cut a 3D object into many 2D cross-sections. Overhanging faces are detected; and, if the option for support material is enabled, it will generate a support structure underneath these areas. From each of these cross-sections, a toolpath for the nozzle is calculated based on printing parameters. Startup and cooldown routines are added at the beginning and end of the print.
Some slicing programs are able to directly connect to and control your 3D printer via USB or WiFi so you don’t need to leave your desk to start a print!
Print settings
When using slicing software, you can choose from a variety of print settings to adjust how your part is printed. Adjusting these settings can change the quality, strength, and total print time. Here are some basic print settings you should be familiar with.
Nozzle and build plate temperature
These temperatures will depend on the material you’re printing with. Typical printing temperatures for PLA plastic are 190-215°C at the nozzle and 20-60°C for the build plate.
Layer height
This setting is quite self-explanatory. It adjusts how thick each layer is. Typical layer heights range from 0.1 – 0.3mm, with 0.2 mm being the standard for most printers. Smaller layer heights result in smoother parts, but due to the increased number of layers, the print takes more time.
Wall thickness
Also referred to as “shell thickness”, this setting is important in determining the strength of your part. Again, it’s quite self explanatory. Each shell is equivalent to the width of your nozzle (0.4mm is a standard nozzle thickness) In most applications, 2-3 shells is enough, however you might want to use more if you need your part to be stronger.
Infill percentage
Most 3D printed parts are not hollow, and most aren’t solid either. The interior volume of most 3D prints consists of a pattern called infill which increases strength and supports the layers above it. Most parts I print have around 10% infill, but sometimes I bump it up when I need the extra strength.
Flow
This is a percentage which modifies the rate at which material is fed into the extruder. Typically this value is set at 100%, but this can be modified based on the material you use. I’ve found that different brands of PLA print best at different flow percentages, but this setting usually has to be tuned to your specific printer.
Typically, 3D printing filament is 1.75 mm in diameter (sometimes it’s 2.85, but most printers support 1.75). If you find that a certain brand of filament is under or over extruding, it could be that the diameter is not exactly 1.75 mm. Most brands are quite consistent, but if you have a roll of cheap material, you may have to adjust the flow percentage to account for this inconsistency.
Print speed
Print speed is simply how fast the nozzle moves while it’s printing. You can change the overall speed (30-60 mm/s is typical for desktop printers), but you can also change the speed depending on what’s being printed.
For example, you can specify that you want your outermost wall printed slower than the inner walls, or that you want your first few layers to print slower than the rest of the print.
You should also take into account the material being printed. If you’re printing a rigid plastic such as PLA, 60 mm/s should be no problem for most printers, but if you’re printing flexible filament like TPE or TPU, you’ll probably want to slow down your print to 30 mm/s or even less.
For travel moves where no material is being extruded, speeds of 120-150 mm/s are quite typical. These faster travel movements can be significantly louder though, so if you wish to reduce the noise coming from your printer, keep these travel moves at around 80 mm/s.
Retraction
Sometimes while printing, the nozzle has to travel from one place to another without extruding any material. During this travel movement, excess material can leak from the nozzle leaving unsightly strings and blobs on your part.
What retraction does is it reverses the extrusion motor slightly, relieving pressure on the molten material while the travel movement takes place. Retraction can be easy to overlook, but it is a very important setting which can greatly improve the quality of your parts.
Enabling retraction increases print time slightly, but it improves the quality of your prints so much that it is certainly worth the extra time.
Retraction distance
This setting determines how much material to retract back into the nozzle. For bowden-style extruders (where filament is fed through a long PTFE tube before reaching the nozzle), this distance should be somewhere between 3—- and 5 mm. If your extruder is direct-drive, 1 mm should be sufficient. If there is still stringing, gradually increase this distance until it stops.
Retraction speed
This one isn’t too tricky to figure out. This determines how quickly the material is retracted. This value should not be too high, because if the retraction is too quick, material which is not melted yet can separate from the molten material in the nozzle causing bubbles and defects. 30 mm/s is a good value to start with.
Support structures

Overhangs are a challenge for 3D printers because plastic will droop downwards after leaving the nozzle. Enabling support material generates an additional supporting structure that is printed at the same time as the part. This mesh is generated just below overhanging features so that the plastic does not droop after being printed.
The process of removing support material can end up leaving imperfections on the surface it was removed from and it can also be difficult to remove, so I highly recommend taking the time to tune your support settings.
Support pattern
Your support pattern determines how rigid your support structure is. Some patterns like ‘concentric’ and ‘lines’ are very easy to remove, but they can be quite weak. Interconnected patterns such as ‘grid’ tend to be quite sturdy, but they can be difficult to remove. If your support structures are quite tall, or prone to getting knocked over mid-print, try using a more rigid pattern.
Support density
This setting is similar to infill. Increase this percentage to make a denser mesh that is harder to remove, but results in better overhangs. I tend to use 15% for most of my prints.
Cooling
Your 3D printer has part-cooling fans which significantly improve print quality while they are active. Once material is extruded from the nozzle, it should be cooled as quickly as possible so that it stays in place. This is especially important when printing bridges and overhanging features.
The exception to this is printing with high-temperature materials such as ABS, polycarbonate, and nylon. They should not be printed with active cooling because they suffer problems with warping and layer adhesion. For most other materials though, proper cooling is highly recommended.
Minimum layer time
Instead of using fans, another way to improve cooling is increasing the minimum time for each layer. When printing very small parts, your 3D printer can go too fast, and extrude molten material on top of a layer that hasn’t cooled down yet. This results in drooping, and low-quality surface finish. A good value to start with is 10 seconds. If, for example, a layer would take 6 seconds to print normally, this setting will tell your printer to slow down so that the layer takes 10 seconds instead.
Lift Head
If enabled, this setting lifts the nozzle away from the print if the minimum layer time has not been reached. This setting should be used if the layer being printed is extremely small. Simply slowing down the print speed will not allow the material enough time to cool, so lifting the nozzle completely away from the print can further help with cooling.
Build plate adhesion
Sometimes your part will have issues sticking to the build plate. You can try a bunch of different ways to get your parts to stick such as using a PEI sheet or applying an adhesive, but your slicer also has options to choose from which can help solve the issue. There are typically 3 options in your slicer when it comes to build plate adhesion: skirt, brim, and raft.
Skirt
A skirt is a small length of extra material extruded right at the beginning of a print. This is done to ensure that plastic is flowing smoothly before the print begins. This setting improves build plate adhesion somewhat by keeping the bottom surface consistent.
Brim
A brim can be generated if your part is having trouble sticking to the build plate. A brim modifies the first layer of your object to increase the surface area, improving build plate adhesion. Brims can be somewhat annoying to remove so only use them if necessary.
Raft
When you enable rafts, a platform is generated which your object is then printed on top of. This feature can be useful if you need the bottom surface of your print to be as smooth as possible. Rafts significantly add to print time and use a lot of plastic, so only use this option if you need to. Keep in mind that rafts reduce the effectiveness of a heated bed.
Other settings
Here are a couple of settings which are important to talk about, but do not fit into any specific category.
Horizontal expansion
Once molten material leaves the nozzle of your printer, it tends to expand slightly. This effect can be quite annoying if you have two parts which need to fit together. A common example of this is when printing holes for screws or rods. For example, if a hole is 10 mm in diameter on your 3D model, it might end up being 9.6 mm when it is actually printed. Adding a horizontal expansion factor of -0.2 mm will negate this effect.
Combing
Travel moves which don’t extrude material can cause defects if the nozzle travels across a line of material that has already been printed. By enabling combing, these intersections are made less visible because the extruder will move overtop of infill as much as possible. This setting will not really increase your print time by a significant amount, and it will improve the quality of your parts slightly as well.
G-code
G-code essentially tells your 3D printer’s nozzle where to go, and how much plastic to extrude along the way. It takes many instructions to print an object so these files can be very long. A small part that takes 1 hour to print can have over 100,000 lines of G-code! Once you have sliced your object, you send the G-code file to your printer and start the print.
Other machines such as CNC routers, water jet cutters, and laser cutters all use G-code to control their motion. Understanding G-code is not strictly necessary if you want to use slicing software, but it is quite interesting to learn, and it can be beneficial if you want to fine-tune and modify and customize your printing routine.
Startup G-code
Before you start a print, there are a few things you can tell your printer to do so that you can improve your first layer. First of all, every print should begin by homing all the axes. This ensures the print begins in the correct location. Then the nozzle and build plate should heat up. It is also a good idea to extrude a small amount of plastic before you begin printing so your nozzle is primed with fresh material. Sometimes while heating, some liquid plastic will ooze out of the nozzle before the print, so extruding a small blob before your print will avoid any defects in your first layer. Typically, this routine is already the default on most slicers, but I’ve found it helpful to adjust this startup G-code to suit my particular setup.
Ending G-code
When a print finishes, you can specify a routine for your printer to follow. There should, at the very least, be some lines of G-code telling the printer to start cooling down the nozzle and build plate, as well as turning off the motors and any cooling fans. I also recommend lifting the nozzle a few millimeters and then homing in X and Y, so that your nozzle does not get stuck on the print once it cools down.
With a bit of G-code know-how, you can program fancy routines such as changing the color on RGB LED strips, or making your printer play a little melody, so that you know it’s finished printing!
Which slicing program to use?
Using slicing software is an essential step in the 3D printing process. There are many slicing programs to choose from, and the one you use is up to you. Most programs are free to download, are open-source, and will work with almost any desktop 3D printer.
Some programs are very user-friendly, and will take most of the guesswork out of choosing the correct settings. More advanced users will want to use more powerful and complex slicers to fine-tune every setting.
That’s it!
You should now be familiar with how slicing software works, some common printing settings, and you should have some idea of what you can do with custom G-code. There is only so much you can learn from reading an article though, so go ahead, download some slicing software and try slicing some objects for yourself!