3D printer problems can range from software faults that merely display a message about the problem to mechanical issues that cause the printer’s moving elements to behave erratically without any obvious flaw. Fixing mechanical problems can occasionally be very difficult. Software issues are usually easier to correct because the reason for the issue is usually clear.
The Ender 3 making grinding noises when printing is one such frequent problem. This may be because:
- The nozzle is scraping the build plate or the printed model.
- The stepper drivers are malfunctioning.
- Overly tight eccentric nuts.
- Belts are skipping or loose.
- The 3D printer is placed on an uneven surface.
- There may be problems with the extruder.
- A higher print temperature is needed.
About the Ender 3…
The Ender 3 is an open-source DIY-FDM (fused deposition modeling) 3D printer. You’ll adore everything this printer has to offer, even though it might be one of the most cost-effective 3D printers available right now.
It may seem difficult to understand how the many components of some 3D printers function together. With an Ender 3, this isn’t the case, though.
You can quickly install all the required parts and have the printer functioning within 2-4 hours thanks to the convenient installation kit, which comes with everything you’ll need to put the printer together.
Related: Anycubic Vyper vs Ender 3(V2/Pro): Which One is Better?
The package comes with an SD card, wire cutters, Allen keys, and a sample spool of filament.
A thorough installation manual with simple-to-follow instructions is also included with the Ender 3. Additionally, you can access online video tutorials to get more assistance with the installation procedure.
You can slice 3D models into the G-code language using the Creality Slicer that is pre-installed on the Ender 3. Then, you can start printing your creations by copying this file to an SD card that is placed in the printer.
Having said that, this printer is also compatible with several slicer applications from third parties, like Cura and Simplify 3D.
The ability to create projects using various filament materials is one of the primary reasons people purchase 3D printers. This enables people to experiment and produce products using a variety of materials rather than just one, resulting in fresh and entertaining finishes.
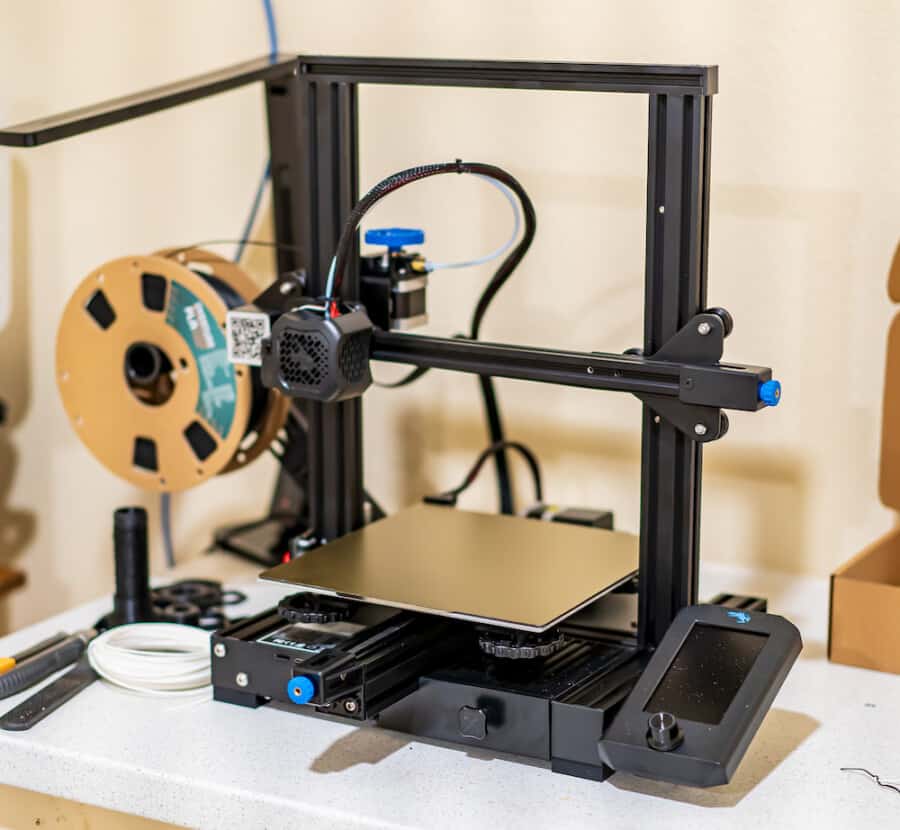
With the Ender 3, you can print with 1.75 or 3mm filament materials, including PLA, ABS, carbon fiber, wood, and more, so you don’t have to worry about compatibility issues.
The large build volume of the Creality Ender 3 ensures that your designs will fit within the printer. Its size allows you to print more models at once than other 3D printers in its class.
The build volume is limited to this size, but you can make it smaller by modifying other elements of the design, such as the infill percentage.
Even if a product is manufactured by a reputable brand or firm, this does not guarantee that there won’t be any performance concerns at all.
Unfortunately, even though the Ender 3 has received mostly excellent reviews, some owners of this printer have reported having problems.
Common Causes & their Solutions
Uneven Print Bed
The most likely cause of grinding noises is nozzle scraping on the model or build plate, as a minor fault in bed leveling or the Z-offset value could easily create grinding noises. Since such a situation can cause harm to both your Ender 3’s nozzle and the build plate, we strongly advise you to pay attention to both the bed leveling and Z-offset value of your machine.
Check that the bed is even and that the Z offset is properly set up. In an ideal case, the gap between the nozzle and the print bed, on each of the four corners and the center of the bed should never be more than the thickness of a piece of paper. For this step, you can use any of the conventional bed leveling equipment (paper, feeler gauge, or auto bed leveling sensor).
Faulty Stepper Drivers
Since the stepper drivers are primarily supposed to deliver the signal to the stepper motors, a defect can substantially raise the noise that the stepper motors produce.
The simplest way to troubleshoot the stepper motors is to dismantle them one at a time and determine if any one specific motor is responsible for the issue. If you can single out a specific faulty motor, it is advisable to double-check the wiring and, if everything else fails, the only option left is to replace the stepper itself.
Overtightened Eccentric Nuts
The eccentric nuts are supposed to gauge the tension in the rollers and enable the print head and build plate to roll on the rails, and excessive tightening will make the rollers grind on the rails, which produces a grinding noise.
The eccentric nuts are placed just at the back of the rollers, loosen them carefully. Make sure that they are not too loose, which might make them wobble. Moreover, it is also essential to remember that eccentric nuts don’t work like traditional nuts as you can’t tighten them by turning them full circle in a clockwise direction as that would only return the eccentric nuts to the exact same spot that you started from.
Loose and Skipping Belts
Loose belts can stop the stepper motors from properly spinning the gears, which results in a problem known as skipping; Skipping inhibits the axes from continuously performing the necessary movements. When the 3D printer’s actual position differs from where it believes it is, is because of these faulty movements and eventually, these faulty movements will result in a grinding sound.
The timing belts must be properly tightened for them to be able to clutch and rotate the gears in a timely manner without skipping any of the necessary motions. To tighten the belt, you simply have to completely loosen the screws that are next to the belt tensioners, then proceed to pull the belts as tight as possible and then tighten back the screws.
Related: Ender 3 Belt Tension Guide
Uneven Surface
Placing a 3D printer on a solid surface or placing it on something solid underneath can also help to stop grinding noises from occurring. Sounds on a 3D printer can be amplified by unstable surfaces like a cart or flimsy table.
Several users have reported that setting their 3D printer on surfaces like a rubber mat or some concrete surface solved the problem.
Based on the surface you have; some users even advise placing your 3D printer on the floor to reduce noise.
They were placed on the floor by some users whose 3D printers were making loud, unpleasant noises, and they have been proven to be effective in reducing vibration and noise as well as being durable.
Loose Cables
A user who was hearing grinding and scratching noises coming from his 3D printer discovered that the noises were really caused by loose cables at the hotend that were being harmed by the fans.
They stopped the cables from bending and causing the fans to make that grinding noise by placing a zip tie closer to the hotend.
Hotend Fan & Cover
The hotend fan itself is another potential source of grinding noises. One user, for instance, discovered that the fan’s grinding noise was caused by a damaged hotend cover screw.
It’s also possible that the hotend fan’s bearings have failed or that the fan is slamming against the housing.
The clear course of action, in this case, would be to either try to inspect the hotend fan housing and screws before attempting a basic repair or to replace the old fan and hotend cover.
On the hotend fan, it’s a great idea to tighten any potentially loose screws.
You could just have too much dust on the blades, which could cause them to spin on the bearings. In that case, you could unscrew the fan and clean the dust off.
Increase Z-Hop During Retraction
The nozzle rubbing against the infill during a travel move is another potential cause of a grinding sound in 3D printers. By activating Z-hop in your slicer or raising the level of Z-hop, you can resolve this problem.
In essence, this lifts your nozzle during movement to prevent striking your 3D print.
Extruder Problems
This grinding sound could be coming from the extruder, which is where pressure builds up, especially when printing at higher rates. Your extruder skipping could potentially be brought on by an overheated motor.
An uneven filament routing might make the extruder work harder and heat up the motor. The current drawn by your stepper driver is another consideration.
Your stepper motors’ operating power is determined by this, therefore if the current is too high, movement problems may result, which could add to the grinding sound.
One user discovered that the extruder noises were caused by a fractured extruder, which is a common problem with plastic extruders. It is advised to buy an aluminum extruder in such a scenario.
After purchasing the metal extruder, a user who had previously experienced a crack in the original plastic extruder stated that the Bowden extruder was an excellent replacement. They also no longer experienced any filament guide issues thanks to the quick installation.
If the extruder’s excessive pressure is what’s causing the grinding noise, you can try lowering your retraction speed to about 30-35mm/s.

Raise the Heat
If your filament is not heated enough, there will be additional resistance when you try to extrude it, which may be the cause of a grinding sound. By raising the print temperature by 5°C or 41°F, one user was able to stop experiencing grinding noises.
You can increase it further if problems persist, or you might have a partial clog that has to be removed. You can raise the hotend temperature above normal to clear this out and then use a nozzle cleaning needle to remove the obstruction.
Related: Best Temperature Settings for Creality Ender 5
Faulty BLTouch Pin
A broken or deformed BLTouch pin may cause your printer to grind.
One user described how her printer no longer functions and makes a grinding noise because of the BLTouch pin.
If this occurs, the BLTouch pin can be quickly fixed by following the instructions below:
- Remove the grub screw from the BLTouch sensor’s top.
- Remove the broken pin.
- Put a new pin into the sensor in place of the damaged one.
- Reattach the grub screw to the BLTouch sensor’s top.
Limit Switch
When attempting to auto-home your 3D printer, you might hear a grinding sound. It’s possible that the limit switch is not being hit, which implies that even when your 3D printer reaches the end of the axis, it will continue to move in that direction.
You need to carefully move the 3D printer to the limit switch after disabling your steppers on your 3D printer’s control panel. If it misses the limit switch, you need to identify the obstruction and remove it.
To solve their problem, one user discovered that extending the limit switch with some regular tape allowed the 3D printer to reach the limit switch. Another user said that they fastened a bobby pin to the limit switch before covering it with tape to keep it in place.
Another issue that may impede the 3D printer’s ability to auto-home is when the plastic housing that covers the Y motor is slightly lifted when one of the corners is higher than the other, or when the Z limit switch stopper is improperly fixed.
One customer discovered that the plastic casing on their Y motor was designed improperly since one of the edges was slightly elevated. On their Ender 3 V2 machine, they ultimately decided to remove it and sand it down with a belt sander, which resolved their problem.
Lubricate Z-axis
If you are having this kind of problem, you should also make sure that your resin printer’s Z-axis is properly greased.
For instance, you can easily lubricate the Z axis of your printer by sprinkling PTFE spray on the lead screw and linear rail, then raising the Z axis upward and downward a few times to let it spread out properly.
When you’re through, your Z axis should be adequately lubricated to stop any grinding or knocking noises that could arise from inadequate lubrication of the Z axis.
Tighten Z-axis Rod
When your resin printer starts to grind, one thing you should examine is the Z-axis rod. When moved, a loose Z-axis rod may generate a grinding sound. Make sure the two screws on the Z-axis rod are securely fastened.
Additionally, make sure that all the Z-axis connectors are securely screwed by first loosening them and then tightening them.
In addition to inspecting all the Z-axis connections, a user who experienced problems with the Z-axis grinding when it was moved investigated all other possible solutions. Upon closer inspection, they discovered that one of the motor cables was merely long enough. They strengthened the connection after noticing that it was also loose. This quickly resolved the problem. They experimented with weakening the connectors to hear if the grinding sound would return. They tightened it once more, and the grinding sound was immediately silenced.
Frequently Asked Questions
Is Ender 3 Good for Beginners?
Because it’s simple to set up and use and produces high-quality prints, the Ender 3 Pro is a terrific first printer. Additionally, it is reasonably priced, making it a great choice for individuals just getting started with 3D printing. Furthermore, there are a ton of online instructions for operating this printer.
Is Ender 3 Better than 5?
The Ender 5 is the clear victor in most categories thanks to its greater size, tried-and-true power supply, improved print quality, and improved filament routing. The Ender 3’s improved firmware and lower price point are its key benefits.
Do 3d Printers Use a Lot of Electricity?
Most 3D printers only consume 50 to 150 Watts of electricity per print. This is roughly equivalent to one or two incandescent light bulbs. To get a more precise estimate, however, you’ll need to perform some calculations or take some measurements because there are numerous different 3D printers and print settings available.
Can Ender 3 Print Nylon?
All Ender 3s can only print out of the box with a select few essential filaments. However, they cannot print Nylon or polyamide. The Ender setups cannot maintain the temperatures needed for this material, which are beyond 250°C or 482°F.
Is It Worth It to Get a 3d Printer?
Many people find that investing in a 3D printer is worthwhile because of how adaptable it is. You can use it to print shoes, make an RC plane or boat, mend things around the house, and build prototypes for your business. There are countless options!
Conclusion
This article covered the numerous causes of grinding/buzzing noises coming from your Ender 3. It also discussed ways to solve those problems.
In conclusion, there are a variety of issues that could cause your 3D printer to be noisy, but some of the more common ones include the nozzle scraping against the print or the bed, defective stepper drivers, loosened belts, and eccentric nuts that are too tight.